wtKST is a clean, simple user interface to the ON4KST online chats – with some extra features for Aircraft Scatter prediction.
Download the latest version: https://github.com/dl8aau/wtkst/releases
wtKST was written by DL2ALF, the author of the AS prediction program AirScout and the two programs are linked. If AirScout is running in the background, wtKST will check the list of stations that are logged into KST and alert you about possible AS opportunities. Click on a callsign and the AirScout map will appear with more information.
Note: wtKST is now being maintained by Alex DL8AAU. Please do not ask questions to DL2ALF!

wtKST has one fixed-format screen, divided into four main areas:
- All the chat traffic (Left) – like the official ON4KST chat interface… and just as unreadable when the bands are busy.
- A ‘filtered’ chat window (Lower Left) containing only the messages to and from yourself (like the KST2me filtered chat, but no setup required)
- Message input line (Top Left).
- KST login list (Right). If AirScout is also running, this is where the added info about AS opportunities will appear (see below).
wtKST is less configurable than either the ON4KST interface or KST2me by OZ2M – but the features you most want are already there. They are also easy to use:
- To send a message: left-click on any callsign on the login list. /cq [callsign] appears in the message entry line (top Left). Add the rest of your message and click Send.
- See your personal message traffic in the lower window (including your own outgoing messages if that option is selected – see below).
- Resize the chat windows – you can click-and-drag the boundary between All Messages and My Messages at any time you need.
wtKST Setup
You should only need to do this once – just follow these instructions.
- Before you begin: you must already have signed up with the official ON4KST site to register your username and password. (Remember to exit from the ON4KST program!)
- Download the latest version from https://github.com/dl8aau/wtkst/releases
Unzip the .zip file to a directory of your choice, and wtKST.exe should run. - In wtKST: click Options, choose the KST tab, and enter that same login information. Also enter your station info and other selections.

- Next, click the Calls tab and choose which bands and stations you want to display.

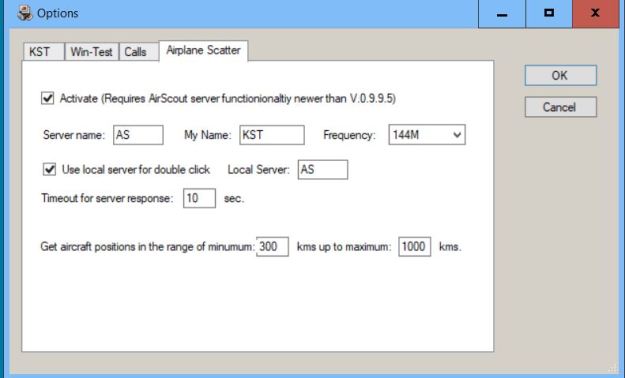
- Move along to the Airplane Scatter tab and check the two boxes below (use the default server settings). The bottom line lets you choose the minimum and maximum aircraft ranges you wish to know about.
-
- Close the Options dialog and you re ready to go – wtKST is now your window into the selected ON4KST chat.
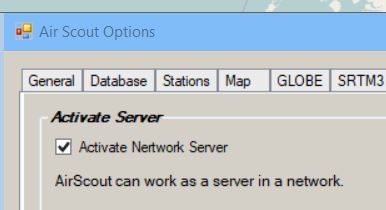
- To get the information from AirScout, open that program, and choose Options from the main screen. Select the Network tab and check Activate Network Server.
- Close the Options dialog and you re ready to go – wtKST is now your window into the selected ON4KST chat.
wtKST will now begin to highlight Aircraft Scatter opportunities with various stations in the Right-hand columns. (The quickest way to populate these columns is to open AirScout before you start wtKST.)
wtKST In Action
The chat function has already been described. The rest of this section is about the extra features in the Right-hand columns of the wtKST display.
NB: you will only see info about stations that are logged into KST. Don’t forget there are other stations on the band too!
-
-
- The Call column is obvious. Left-click on the word Call to sort the list into callsign order. (Left-click again on the Call header to remove this feature.)
- The A or Activity column shows the number of minutes since that station posted to KST. Left-click on this column header to prioritize the most active posters (Left-click again on the A / Act header to remove this feature.)
- To see information about a station – including distance and beam direction – move the pointer over that station’s Call, Name, Locator or Act.
- To send a message to someone, Left-click on that station’s Call, Name, Locator or Act. Then type into the message input line (see above).
- The AS column shows Aircraft Scatter opportunities for each station. This powerful feature is unique to wtKST, but it is only active if AirScout is already running.
– Same as with AirScout, purple blobs in the RH columns mean “AS to this station is possible now!” Red followed by a number means “AS coming soon, in n minutes”. Brown/orange means “aircraft is on track, but currently too low”. Bigger blobs indicate more/better opportunities.
– Depending on your minimum and maximum distance settings (see wtKST setup above), you may also see < which means “Too close for AS”, or > which means “Too far away for AS”.
– Left-click on these indications to open the main AirScout map, showing the AS path to the selected station.
– Right-click in this column to see details of the target aircraft. - The far Right-hand columns indicate which bands a station is active on (probably according to their information in the AirScout database). You can click on these colours to change them in your own display.
-
If you have further info about the wtKST setup and user interface, please post a comment here so I can update the blog. Thanks for all suggestions!
